Blogger is very robust and easy to operate CMS platform, you don't have to be a geek to operate the dashboard or settings. But with easiness, there comes some limitations, By default you can't create a Contact us page, you have to either you have to use any third party plugin or have to tweak blogger's official contact widget, so that it can work on static pages. Creating a separate page for contact purpose is very professional and also makes your blog clean by hiding unnecessary widgets and plugins thats’s why , Lets move further and see How to create Contact Us page without Adding Contact Form Widget in Blogger Blog.
Before Editing we recommend you to make a backup of your template, so that anything goes wrong you still have your blog design safe.
The First thing you need to do is to login into your Blogger account and go to Blogger Dashboard > Theme > Edit HTML and search for the ending ]]></b:skin>tag and just Above it paste the following code.
To Create Contact Us Page Go to Blogger Dashboard.

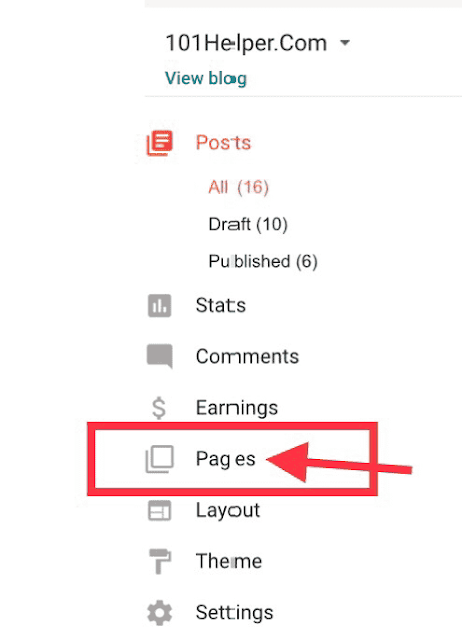
Click on the Pages

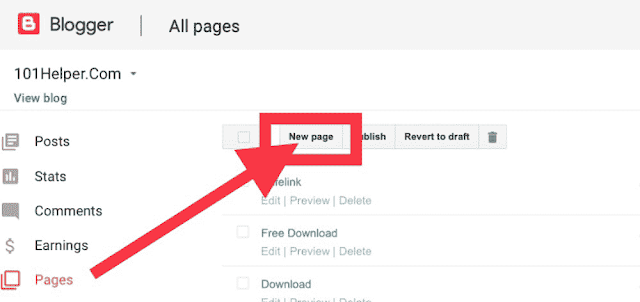
Click on the New Page Button.

Add the following CSS Code.
Hiding The Widget (If already Added Contact Form Widget in your template).
Before Editing we recommend you to make a backup of your template, so that anything goes wrong you still have your blog design safe.
The First thing you need to do is to login into your Blogger account and go to Blogger Dashboard > Theme > Edit HTML and search for the ending ]]></b:skin>tag and just Above it paste the following code.
.sidebar .widget.ContactForm {
    display: none!important;
}
Creating a Page
To Create Contact Us Page Go to Blogger Dashboard.

Click on the Pages

Click on the New Page Button.

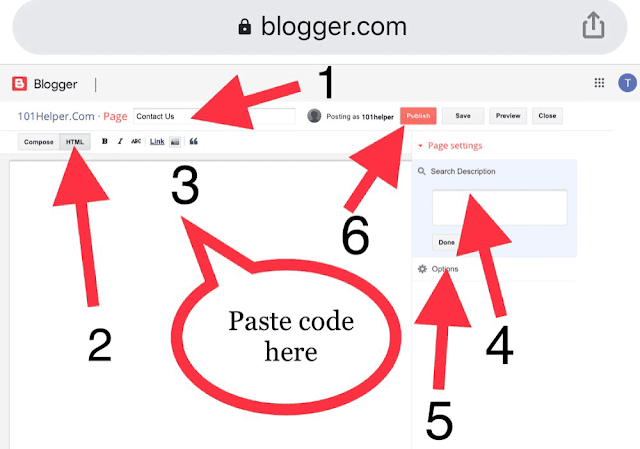
- Give The title Contact Us
- Click On HTML and Copy and Paste the following Html Code
<form name="contact-form">
<div class='formcolumn1'>
<input id="ContactForm1_contact-form-name" name="name" placeholder='Name' size="30" type="text" value="" /> </div>
<div class='formcolumn2'>
<input id="ContactForm1_contact-form-email" name="email" placeholder='Email' size="30" type="text" value="" /> </div>
<div class='formcolumn3'>
<textarea cols="25" id="ContactForm1_contact-form-email-message" name="email-message" placeholder='Message' rows="7"></textarea> </div>
<input class="ripplelink" id="ContactForm1_contact-form-submit" type="button" value="Send Now" />
<div style="max-width: 100%; text-align: center; width: 100%;">
<div id="ContactForm1_contact-form-error-message">
</div>
<div id="ContactForm1_contact-form-success-message">
</div>
</div>
</form>
Add the following CSS Code.
<style type="text/css">
#ContactForm1{display:none}
#ContactForm1_contact-form-name, #ContactForm1_contact-form-email{display:inline-block;width:100%;height:auto;margin:10px auto;padding:14px;background:#fff;color:#222;border:1px solid rgba(0,0,0,0.08)}
#ContactForm1_contact-form-email-message{font-family:'Roboto';width:100%;height:250px;margin:10px auto;padding:14px;background:#fff;color:#222;border:1px solid rgba(0,0,0,0.08)}
#ContactForm1_contact-form-name:focus, #ContactForm1_contact-form-email:focus, #ContactForm1_contact-form-email-message:focus{background:#fff;outline:none;border-color:rgba(0,0,0,0.18)}
#ContactForm1_contact-form-submit{background:#fff;color:#5f6368;font-size:16px;width:161px;height:45px;float:left;padding:0 0 0 20px;margin:10px 0 3px 5px;cursor:pointer;border:none;border-radius:24px;box-shadow:0 1px 2px 0 rgba(60,64,67,0.302),0 1px 3px 1px rgba(60,64,67,0.149);transition:box-shadow .08s linear,min-width .15s cubic-bezier(0.4,0.0,0.2,1)}
.formcolumn4{position:relative}
.formcolumn4:before{background-image:url(https://blogger.googleusercontent.com/img/b/R29vZ2xl/AVvXsEiN0voKHKuj0EDxLtL2tIAMM5EQLar7dwYeFkSKwh_emLtyLSz1jaTQ9l34qdLSZ3RyTllNo6-p7fHEKoCS0DhLm1nbE2Dtvfud4wQ3rLr31A-Aqe2Y5GsavlE4L9uz8L_rbEXaWTPqrzQW/s1600/Mail-me.PNG);background-position:center;background-repeat:no-repeat;background-size:20px;content:'';display:block;height:63px;width:32px;position:absolute;z-index:1;left:15px;top:0}
#ContactForm1_contact-form-submit:hover{background:#fafafb;box-shadow:0 1px 3px 0 rgba(60,64,67,0.302),0 4px 8px 3px rgba(60,64,67,0.149)}
#ContactForm1_contact-form-error-message,#ContactForm1_contact-form-success-message{margin-top:35px}
form{color:#888}
.formcolumn1,.formcolumn2{float:left;width:50%}
.formcolumn1,.formcolumn2{margin:0 0 10px 0;padding:0 10px 0 0}
.formcolumn2{padding:0 0 0 10px}
@media only screen and (max-width:768px){
  .formcolumn1,.formcolumn2{width:100%;padding:0}
}
</style>
If you want to add this CSS Code in the Template, add right just bellow the code ]]></b:skin>. With the Blogger’ Conditional Tag.
<b:if cond='data:view.isPage'> <style>
..........
..........
<style>
</b:if>
Add the Following JavaScript Code.
<script src="https://www.blogger.com/static/v1/widgets/2271878333-widgets.js" type="text/javascript"></script>
<script type='text/javascript'>
if (typeof(BLOG_attachCsiOnload) != 'undefined' && BLOG_attachCsiOnload != null) { window['blogger_templates_experiment_id'] = 'templatesV1';window['blogger_blog_id'] = '<data:blog.blogId/>';BLOG_attachCsiOnload(''); }_WidgetManager._Init('//www.blogger.com/rearrange?blogID\x3d<data:blog.blogId/>','<data:blog.url/>','<data:blog.blogId/>');
_WidgetManager._RegisterWidget('_ContactFormView', new _WidgetInfo('ContactForm1', 'footer1', null, document.getElementById('ContactForm1'), {'contactFormMessageSendingMsg': 'Sending...', 'contactFormMessageSentMsg': 'Your message has been sent.', 'contactFormMessageNotSentMsg': 'Message could not be sent. Please try again later.', 'contactFormInvalidEmailMsg': 'A valid email address is required.', 'contactFormEmptyMessageMsg': 'Message field cannot be empty.', 'title': 'Contact Form', 'blogId': '<data:blog.blogId/>', 'contactFormNameMsg': 'Name', 'contactFormEmailMsg': 'Email', 'contactFormMessageMsg': 'Message', 'contactFormSendMsg': 'Send', 'submitUrl': 'https://www.blogger.com/contact-form.do'}, 'displayModeFull'));
</script>
If you want to add this Javascript Code in the Template, add right just Above the code </body>. With the Blogger’s Conditional Tag.
<b:if cond='data:view.isPage'>
..........
..........
</b:if>
- Click on the Search Description and write the description.
- Then, click on the Option Select Don't allow, hide existing and click on the Done. After that, Publish the Contact Us Page. View Demo
